How to Configure Microsoft Outlook 2016 with your Email?
The following article shows how to configure your email with Microsoft outlook 2016. We have come up with both Manual & Automatic Configuration steps for understanding which is given as below:
Automatic Step
Step 1:
For adding your email account there are two ways as mention below-
- You can Directly select Add Account button and navigate to Step 3
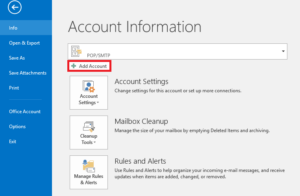
- Or you can Choose File menu -> Account Settings-> Account Settings.
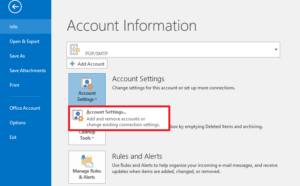
Step 2:
Then Click on New tab.
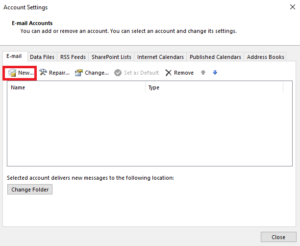
Step 3
Once done, you may be prompted for the specified email and therefore the password for the account you would like to add. Further fields can seem that are necessary to set up the sending and receiving server for your emails once you begin typing. We’ve given a list of these fields and therefore the necessary data that you just should fill in!
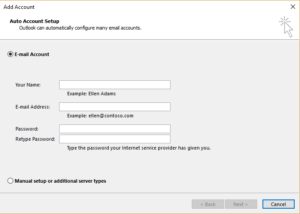
- E-mail address: Enter your email address ([email protected])
- Password: for your domain Type in the password
- Username: This field indicate the full email address that will be get used for both incoming and outgoing connections
- Type: choose whether or not you would like to use the IMAP or the POP3 protocol.
Once all the above fields get filled , press Next button to proceed.
The below screen seems showing email configuration success. Just in case of any errors, they’ll be listed within the error tab

And that’s all! Your email account is configured. Now begin with sending and receiving emails!
Manual Setup
You can even prefer to set up emails via Manual Setup as shown below
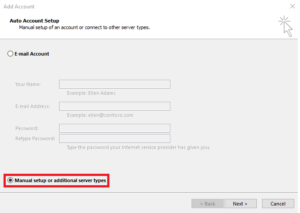
Select Manual or Additional Server Types and click on Next
Now fill the details as below
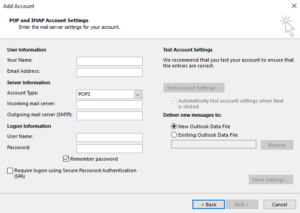
Your Name: Enter Your Name
E-mail address: Enter your email address ([email protected])
Account Type: choose whether or not you would like to use the IMAP or the POP3 protocol.
Incoming server: Here in this field you have enter the mail subdomain of your domain name (mail.yourdomain.com)
Outgoing server: As above, as that you entered for the incoming server use the “mail.yourdomain.com” .
User name: this can be your full email address that may be used for each incoming and outgoing connections
Password: For your domain type in the password
Note: it’s counseled that you just select the IMAP protocol. Doing so can enable you to keeps your emails on the server reducing the chance of losing data.
Use SSL to connect: Check this box if you’ve got an SSL certificate for your domain. This adds an additional layer of security for each outgoing and incoming emails
Once all the main points are filled, click on a More Settings Button. An Internet e-mail settings pop-up can seem
Now select the Advanced tab
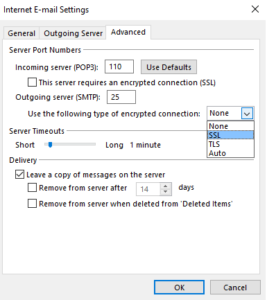
- For encrypted connection Choose “this server requires an encrypted SSL Connection”
- Select the sort of encrypted connection from drop-down menu as SSL
- Check the choice Leave a replica of message on the server
- Click OK
The below screen seems showing email configuration success. Just in case of any errors, they’ll be listed within the error tab
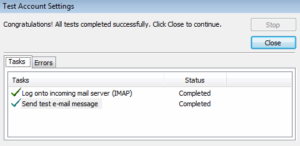
And that’s all! Your email account is configured successfully. Now you can begin with sending and receiving emails!