How to Set the Custom Port for MSSQL Remote Access?
Follow the steps as given below to assign a TCP/IP port number to the SQL Server Database Engine :
STEP 1: Open the SQL Server Management Studio and login to your Database locally using login details.
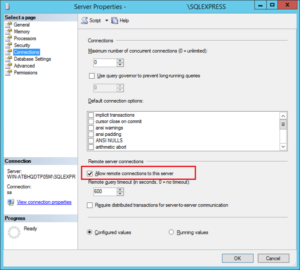
STEP 2: In the left panel, right-click on the server name and choose Properties.
STEP 3: On the left side Select the Connections page and ensure that “Allow remote connections to this server” option is checked. Then exit SQL Server Management Studio.

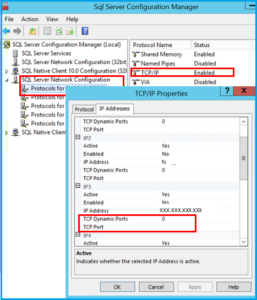
STEP 4: Then Open the SQL Server Configuration Manager and expand the node SQL Server Network Configuration. Then choose Protocols for SQLEXPRESS (or whatever the name of your SQL Server instance is). Ensure that TCP/IP protocol is enabled.

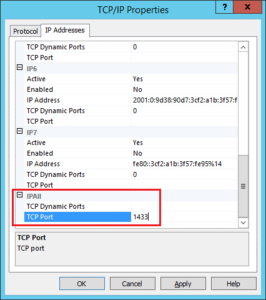
STEP 5: Right click on TCP/IP and select Properties. Within the TCP/IP Properties dialog box, click on the IP Addresses tab and scroll all the way down to IPAII section. check that TCP Dynamic Ports is blank which TCP Port is ready to 1433 (or whatever you want to set TCP Port).

STEP 6: 1st Click on Apply button and then the OK button to save lots of your changes. then restart your SQL Server instance.
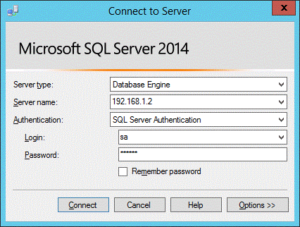
Now you’re ready to connect with your SQL Server instance remotely the help of SQL Server Management Studio.

If there’s problem act in remote connection, you most likely to put together your firewall settings. Check that the TCP port 1433 isn’t blocked by your firewall.
Take a look at the subsequent steps to create a new rule in firewall setting for remote affiliation.
STEP 1: Within the Windows Firewall in Control Panel, click on the Advanced Settings option on the left OR Start >> Run >> Type wf.msc and press Enter.
STEP 2: Within the Windows Firewall with Advanced Security window that opens, click on the Inbound Rules within the left panel. Click on the New Rule on the proper panel of the window.

STEP 3: Choose Port on the list of choices and click on Next.
STEP 4: Choose TCP (or UDP if that’s what you require) and Specific local ports, and so enter your ports within the text enclose front of Specific local ports (i.e. 1234). Click Next.
STEP 5: Choose Allow the connection. Click on Next.
STEP 6: Choose the choices that you would like from Domain, Private, Public. Click on Next.
Domain – When the computer is linked to a network domain then only this rule will be applicable.
Private – When the computer is linked to trusted private networks then only this rule will be applicable.
Public – When the computer is linked to untrusted public networks then only this rule will be applicable.
STEP 7: After all, Enter the Name and Description in the text boxes individually. Then click Finish.
After following the steps as explained above your port should be allowed through the Windows Firewall.
