How to change the Server IP address in your WHM / cPanel
1. Updating the IP address in the Control Panel.
Below are the steps used to change the IP for the WHM/cPanel.
- Using an SSH interface like PuTTY you can connect to your VPS server.
- Update the following command in you control panel license.
# /usr/local/cpanel/cpkeyclt
- Now log into the WHM panel using this address: https://new_server_ip:2087
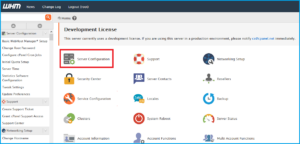
- Go to Home>>Main >> Sever Configuration >> Basic cPanel and WHM setup menu and click on All Tab.
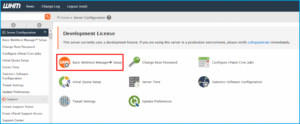
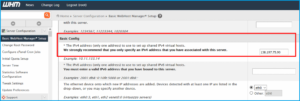
- To set up the Shared Internet protocol virtual host, the ‘IP address‘ field is used. Enter the new Internet protocol address in the ‘Basic Config‘ section at that time save the changes.
- Go to Home >> Main >> Account Functions and change the IP address of the site so that the added user sites’ IP is updated.
- After selecting the ‘User‘ then click on ‘Change‘.
- From the drop-down menu select the new IP address and click ‘Change‘.
Repeat the above procedure for every newly created user. By searching the users using the User Name or the Domain name using the account search function this process can be accelerated faster.
2. On your DNS server updating the IP address
The following step will show how to change the IP address for the private name servers (NS) of your specified DNS server.
- Come on Home >> Main >> Server Configuration >> Basic cPanel & WHM Setup menu and click on All Tab button.
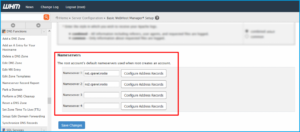
At this juncture beneath the ‘Nameservers‘ section change the Internet protocol address and click save the changes.
3. Update the A Record.
To update the A-records for the prevailing zones in the DNS on the WHM cPanel follow the below steps.
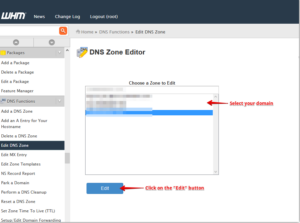
- Come on Home >> Main >> DNS Functions >> Edit DNS Zone menu.
- Select the ‘Domain‘ and the ‘Edit‘ button.
- To the A record apply the new IP address.
- This procedure has to be repeated for all added domains.