WordPress Toolkit
Key Features
- Quick and Simple Deployment
- Replication & Sync
- Debug Administration
- Superior Auto Update Control
- Easy migration for single Remote WP instance
- Site Indexing
- Plesk Resellers
- WP-CLI
- API RPC + CLI Support
Installing WordPress
In order to install WordPress, follow the steps below
Follow the steps below for installation of WordPress
- Select Websites & Domains > WordPress
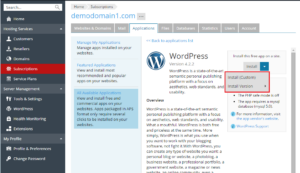
2. Click on Install
The following options will come –
- Select Install (Quick) for quick installation . By selecting quick option, install’s the latest version of WordPress with default settings.
- Select Install (Custom) for custom installation. This selection will help you to complete the installation with custom settings. It will setup the administrator user, desired WordPress version, desired database name, and many.
Note: Installation of WordPress via the WordPress Toolkit is performed from the official WordPress site
By default, installed WordPress site has https prefix for the installation path.
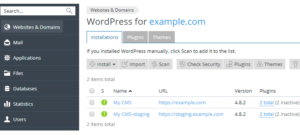
3. Go to Websites & Domains > WordPress to see the list of all installations attached to the WordPress.
Steps to feature Existing WordPress Installations to WordPress Toolkit
By default, WordPress installation through Toolkit or Application page seems within the WordPress Toolkit. However, just in case of a manual installation, the user can have to be compelled to attach existing installation to the WordPress Toolkit. therefore those upgraded from associate degree earlier version of Plesk to the most recent one and have used WordPress ought to attach their existing installation to the WordPress Toolkit.
Steps to Attach WordPress Installation
1.Go to Websites & Domains > WordPress
2. Now, click on Scan.
Note: New manual installation after the scan will not be added to Toolkit. So, you will have to repeat above step to get it added to Toolkit.
Steps to Detach WordPress installation
- Go to Websites & Domains > WordPress
- Select the WordPress installation name.
- Click on Detach
Note: If you make a new scan for WordPress installation, a detached installation will also be attached to the Toolkit again.
Remove a WordPress Installation
- Go to Websites & Domains > WordPress
- Select WordPress installation name
- Click Remove.
Steps to Migrate WordPress Installation
Below are the steps for Migrating WordPress:
-
-
- You can migrate WordPress websites using the “Web Site Migration” feature.
- When you migrate a WordPress website, Plesk copies all its files and the database to your server.
- Once a website has been migrated, you can manage it using WordPress Toolkit.
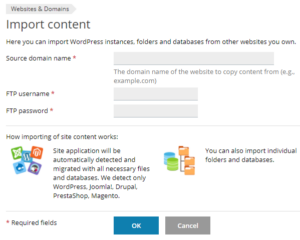
- To migrate an existing WordPress website, Go to Websites & Domains > WordPress
- Click on Import
- Enter the Source Domain Name, FTP username and FTP password.
- Click Ok.
-
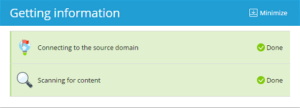
Once you have completed the above steps Plesk will try to connect to the source web site and scan it for content.
If it founds the connection is not successful, here are the following point’s to be checked:
- Firstly check if the source web site’s domain name resolves to the correct IP address from the destination server.
- Look at if the Source FTP server is operating properly. Make sure that there are no necessary ports which are filtered by the firewall on either server.
- Examine whether you have entered the correct FTP username and password
- Make sure that the FTP user has access to all files and directories present in the source web space.