How to Remove DNS Zones from WHM
In this tutorial, we’ll show you using WHM how to delete DNS zones.
A domain on your server could expire at any time. Either that or the domain has been claimed by a distinct DNS server. it’ll nearly always result in an error. After you try to register an account for that domain, it shows a DNS Zone already exists. So, you would like to delete the DNS zone for that domain to mend the matter. WHM permits users to update or delete DNS zones in a few easy steps.
So, below are the steps to delete the DNS Zones:
1. As “Root user” Log into WHM.

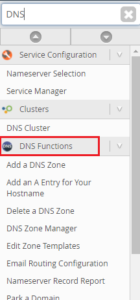
2. Now select the “DNS Functions option” from the navigation menu.
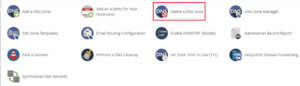
3. After that Click on “Delete a DNS Zone”.
4. There’ll be a listing of existing DNS zones displayed. You’ll be able to delete DNS zones by choosing them and clicking the “Delete button”.
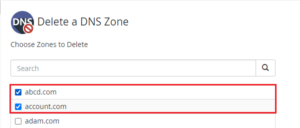
5. You’ll be able to simply edit the list and select which records you would like to keep/remove from the DNS zones. Once you finished, click on Delete.

6. WHM can delete the DNS zone(s) you’ve chosen from your server.
Note: You will not be able to delete a DNS zone using this methodology in some instances. It’s as a result of that zone must have been configured for HTTP use by another account. Follow these steps To delete the domain:
- With the help of the Modify an Account interface, you can change the domain.
- You can delete the account using the Terminate Accounts portal.
We sincerely hope that you simply should now have got a transparent idea concerning How do you remove DNS Zones from WHM. However, if you’re still facing any issue within the procedure mentioned on top of, feel free to reach out to the Ownwebservers team for proactive support 24×7.