How to Compress Website Content Using cPanel
Compressing your web site content before sending it to users’ browsers will make your web site load additional quickly. This could be useful for each the client expertise and for SEO.
You can implement compression easily within cPanel. Here, we’ll explain how.
You can implement compression simply within cPanel. Here, we’ll justify how.
1. Log in to your cPanel account using username and password.
2. Go to the Software section and click on Optimize Website.

3. On the Optimize Web site page, you’ll find three options for compressing your content.
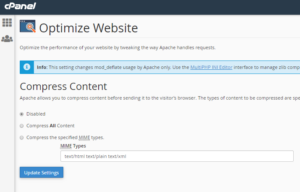
These are:
- Disabled: This can be the default setting and means your files are not compressed.
- Compress All Content: this will compress all the files sent to your user’s browser.
- Compress Specified MIME Types: this enables you to specify which types of content you want to compress. (For more information about MIME types, visit
https://webplatform.github.io/docs/concepts/Internet_and_Web/mime_types/)
4. If you decide on to compress your files, ensure your web site is performing as expected as you have got updated your settings. If it isn’t, you will have to disable compression or narrow down the MIME types you’re compressing.
5. After you have made your choices, click the Update Settings button.
6. If you decide on to compress your files, ensure your web site is performing as expected as you have got updated your settings. If it isn’t, you will have to disable compression or slim narrow the MIME types you are compressing.